UDDI Services are IIS hosted web services that require some kind of database.
So before installing UDDI Services you need to have IIS up and running.
Click on the screenshots to get a larger image.
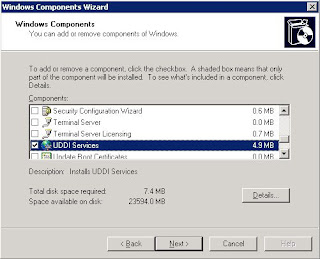
1.) Add UDDI Server Component
Choose
Start - Settings - Control Panel - Add or Remove Programs - Add Remove Windows Compontents
2.) Pick UDDI Services
3.) Choose your Database
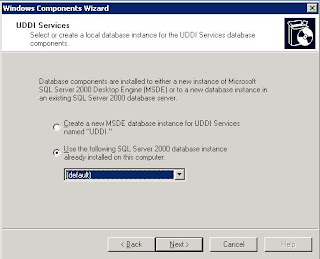
Choose the database component of your choice
If you do not have any SQL Server installed choose "Create a new MSDE database instance"
If you have SQL Server 2000 installed choose "Use the following SQL Server 2000 instance"
If you have SQL Server 2005 installed please follow this instruction before choosing "Use the following SQL Server 2000 instance" option
If you get the error message:
"This database instance does not meet the minimum version or Service Pack level requirements and cannot be used for installation. Please upgrade this instance or select another one."

it means you try to install UDDI Services on a server running SQL Server 2005 and you did not follow the instructions.
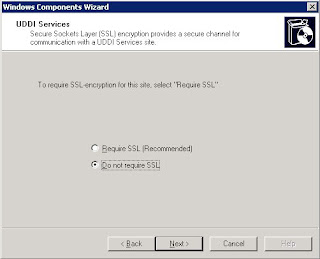
4.) SSL-encryption
If you have SSL configured for your IIS you can enable this option. If you do not have SSL enabled you can disable it here and enable it later when you SSL enabled your IIS.
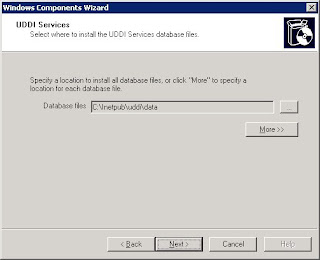
5.) Choose setup location
Just choose the path where to install UDDI Services
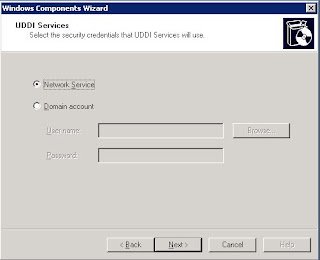
6.) Choose the user
Choose the user UDDI Services will use
7.) Pick a name for your UDDI

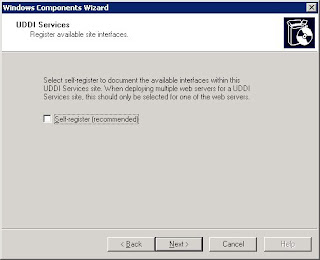
8.) Disable "self register"
This is somehow related to publish the UDDI in Active Directory. I am not really sure what it does so disable it.
Great, we have UDDI Services up and running. Whats next?
Configuration of UDDI virtual directories access
1.) Open Computer Mangement snapin
Choose
Start - Settings - Control Panel - Administrative Tools - Computer Management
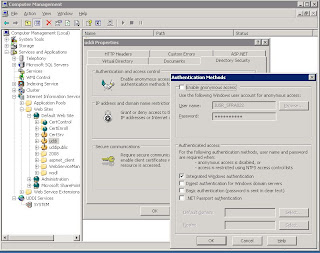
2.) Configure IIS "uddi" virtual directory to use Windows Authentication
in the computer management snap in go to
Internet Information Services - Web Sites - Default Web Site
Right click "uddi" and select Properties
Click on Directory Security, disable anonymous access and tick Integrated Windows authentication.
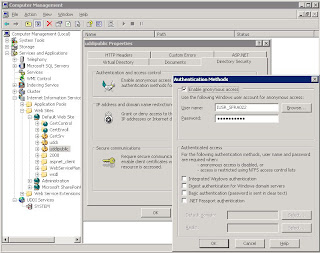
 3.) Configure IIS "uddipublic" virtual directory to use UDDI Authentication
in the computer management snap in go to
Internet Information Services - Web Sites - Default Web Site
Right click "uddipublic" and select Properties
Click on Directory Security, enable anonymous access.
Great, we have configured UDDI Service authentication. Whats next?
Create Windows Publishing User account
In standard configuration every user in servers Administrators group has the right to publish Services.
But I really recommend creating a special user account for publishing UDDI service. That has the advantage you get all services published under one user, which gives you a much better overview over your running services.
In this case I created a User "UDDIAdmin" and added him to the "Administrators" group.
Now log in with your "UDDIAdmin" account, open Internet Explorer and type:
Publish a service on UDDI
http://localhost/uddi/
Now Click on Publish on you will see:
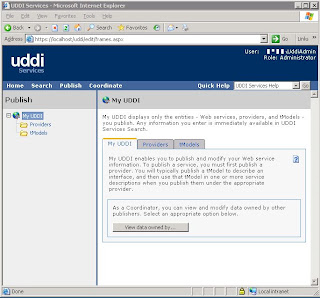
First thing we have to do is to create a provider. A "provider" is also referred as a "business" in UDDI terms. Basically the provider or business is just an embracing category for our services.
Create a Provider
Right click on provider and select "Add Provider". Then click on the new provider and edit the name to be "MyProvider".
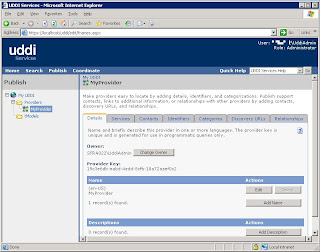
Create a Service
Now right click on Provider and select "Add Service". Then click on the new service and edit the name to be "MyService".
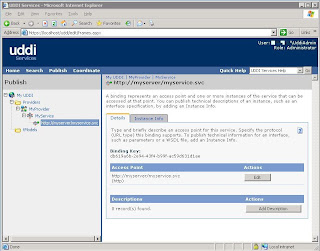
Create a binding
Now right click on Service and select "Add Binding". Then click on the new binding and edit the URL to be the URL to your Service. "http://myserver/myservice.svc" in this case.
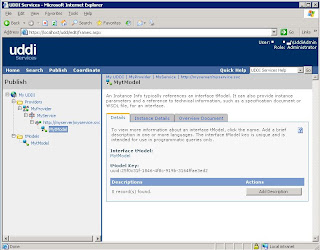
Create a tModel
Now right click on tModels and select "Add tModel". Then click on the new tModel and edit the name to be "MytModel".
What not really required but what makes it more UDDI is the following...
Click on the "Categories" tab and click on "Add Category". Now select "uddi-org:types" "Specification for a web service" "Specification for a web service described in WSDL" and click on "Add Category".
Now click on the "Overview Document" tab. Click on "Edit" and paste a link to the wsdl document of the service. e.g. http://myserver/myservice.svc?WSDL.
You could use these attributes later to pick the right tModel
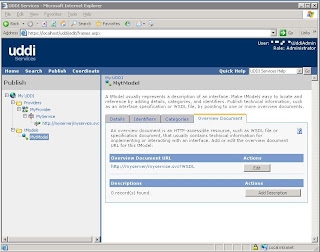
Add instace Info
Now as a last step right click on your service select "Add instance info". Now type in "My" in the search box click on search and select "MytModel" from the list.
Done. We have published our first service in the UDDI.
Great, but what I do now with my UDDI?
A simple UDDI query in C#
You can install the Windows Server 2003 SDK or simply add a link to Microsoft.UDDI.dll in your C# project. Where to find those is described here.
Now implement the following code:
//URL to your UDDI directory
string uDDIURL = "http://myserver.com/uddi/";
// Take your tModel Key here. Look on the screenshots
string modelKey = "uuid:25f0c31f-1846-4f8c-919b-3164ffae3ed2";
// Take your service Key here. Look on the screenshots
string serviceKey= "49263d91-85e7-4285-b36c-a217d6a8e1b9";
// Create UDDI location object
UddiSiteLocation _siteLocation = new UddiSiteLocation(uDDIURL + "inquire.asmx",
uDDIURL + "publish.asmx",
uDDIURL + "extension.asmx",
string.Empty,
Microsoft.Uddi.AuthenticationMode.WindowsAuthentication);
// Initialize a new instance of the FindBinding class used to locate the service.
// Add the service key to the binding.
FindBinding _findBinding = new FindBinding(modelKey);
_findBinding.ServiceKey = serviceKey;
// Create the managed URL object. It is dynamically updated by the UDDI Registry
UddiConnection _connection = new UddiConnection(_siteLocation);
ManagedURL managedURL = new ManagedUrl(_connection, _findBinding);
if (managedURL.Count > 0)
Console.WriteLine("Hooray we did it");
Please keep in mind the managedURL object now keeps a steady connection with the UDDI and gets information on newly published or removed services. So there is absolutely no need to recreate the manageURL object in order to refresh it.
Further tips regardings UDDI Services can be found here.
For further examples please see this article on codeproject.com which includes some source code.
2 comments:
Thanks so much for putting this together. I am new to all these and this info is so very helpful
I am grateful to you for providing this concise information which I had been desperately looking for!!
Post a Comment